Your Cart is Empty
QUILT ALONG WITH RANAE LIVE IN HER STUDIO—JOIN THE FREE-MOTION MASTERY IN A MONTH FACEBOOK GROUP!
Once all 16 blocks were quilted, it was time to cut and recombine them to create my quilt. To assemble my Free-Motion Mastery in a Month quilts, I use a quilt-as-you-go technique that I call "Quilt First, Piece After" (you can see it in this video).
Because Anna Maria Horner's fabric combined both perpendicular and diagonal lines, I thought the cutting the blocks with a similar combination of perpendicular and diagonal lines would complement the design of the fabric in the overall design of the quilt. So, here's how I cut the block, using my FMM30 Square-Up Ruler:
1) I squared up the block to 10" on all sides.
2) I used the 10" quarter-square triangle line to cut off the corner.
3) I used the half-block line to cut down the middle.

At first, I thought I wanted a random look, like this. I did several dozen rearrangements on my design wall, moving pieces around to get colors and textures balanced, yet dynamic.

Then COVID struck, and the blocks stayed on my wall for much longer than I had planned. The more I looked at the design, the more I felt that it lacked focus. Then, one day as I was moving pieces around again, I noticed diamonds taking shape at some of the diagonally-cut corners. So, I rearranged to bring a pair of diamonds to the center. The design started to gain focus.

I felt like the diamonds needed to be clearer, so I sliced the corner triangles again, into three sections like this:

Then I placed solid-color strips of quilted fabric in the middle stripe. I got some of these by turning over the cut strip, and others were strips trimmed off the edges of the blocks when I squared them up.
I also rotated some of the side blocks so that the triangles faced the center. I cut those triangles and inserted colored strips in those too, creating a bigger diamond that united the two smaller ones.
Now the layout looked like this:

I assembled all the sections with joining strips (see this video for how to assemble quilt-as-you-go blocks). Most of the joining strips are dark grey, but since I didn't want to have grey lines through the colored diamonds, I figured out a way to change the color of a joining strip in mid-block to match the colors of the diamonds. It took a bit of work but I think the effect was TOTALLY worth it!
Once I had the whole center section of the quilt put together it was time to add the borders. I realized that with the remaining strips, I could add one more diamond to the quilt, extending into the borders.
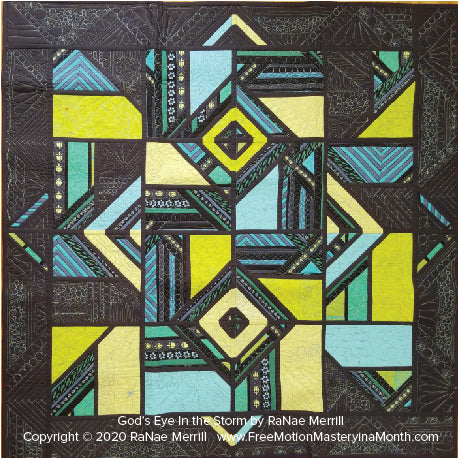
This is the finished quilt. I'm really glad it had time to develop into a design that is far better than what I first imagined!

(By the way, some people have asked me for a pattern for this quilt, but I'm not sure how you could ever recreate this design without this specific large-print fabric.)
~ ~ ~ ~ ~ ~
Happy Quilting!
Comments will be approved before showing up.